Submitting a Plan of Development or Subdivision Related Job
Note: the screenshots throughout may reference Plan of Development applications; however, the screens are identical to Subdivisions. Also, the fields outlined in this guide may not be required by the system in order to submit an application. They are, however, required by Planning and may hold up your application if not all fields are filled out appropriately.
A customer account is required to submit an application for review/approval. Go to build.henrico.gov and log into the system as directed. On the home screen, click Land Development Applications.
Choose which type of submission you would like (Subdivision or Plan of Development). Note: if you are submitting for a development that includes both a POD and SUB, submit the POD first, then the SUB. This will allow you to associate the SUB with the POD.
Select and/or fill in all required information (Application Type Description, Application Type, Scope of Work, and Description of Activity). For scope of activity either select New or Reconsideration unless otherwise instructed by Planning Staff. If only one option is available, Build Henrico will automatically update the scope.
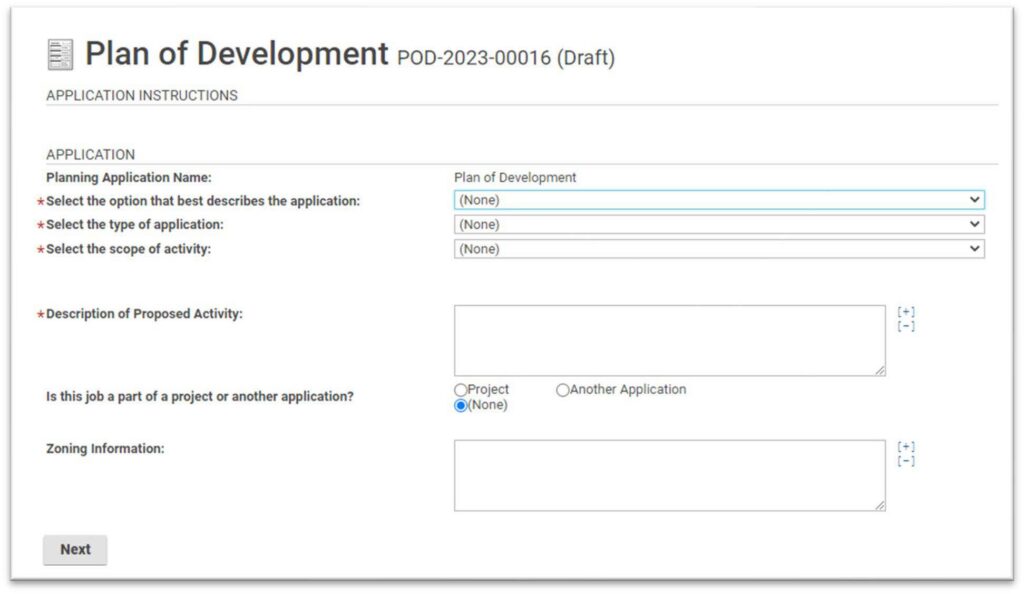
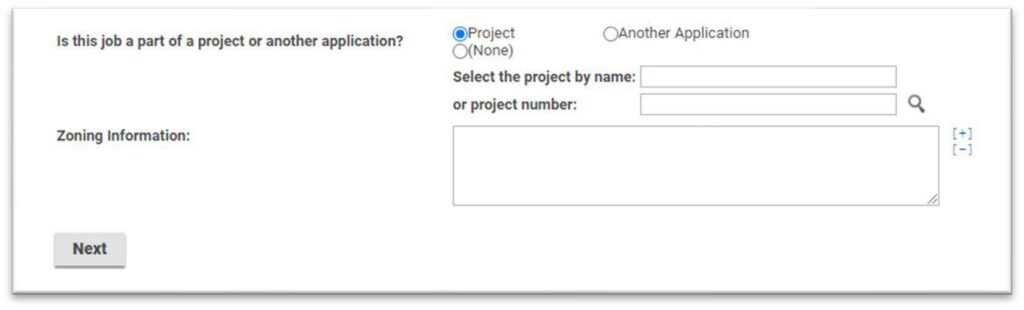
If part of another project or other application, choose appropriately and enter in the project name/ number and click the magnifying glass. After selecting the appropriate project, click okay. (Refer to the When submitting for a subsequent plan review section). Click Next.
Complete Acreage (to the hundredth decimal point), Religious Use, and Number of Seats, when applicable. Density and Number of Lots/Units should be filled out for Subdivisions. As the Number of Lots/Units is required, for all other submissions enter in 0.
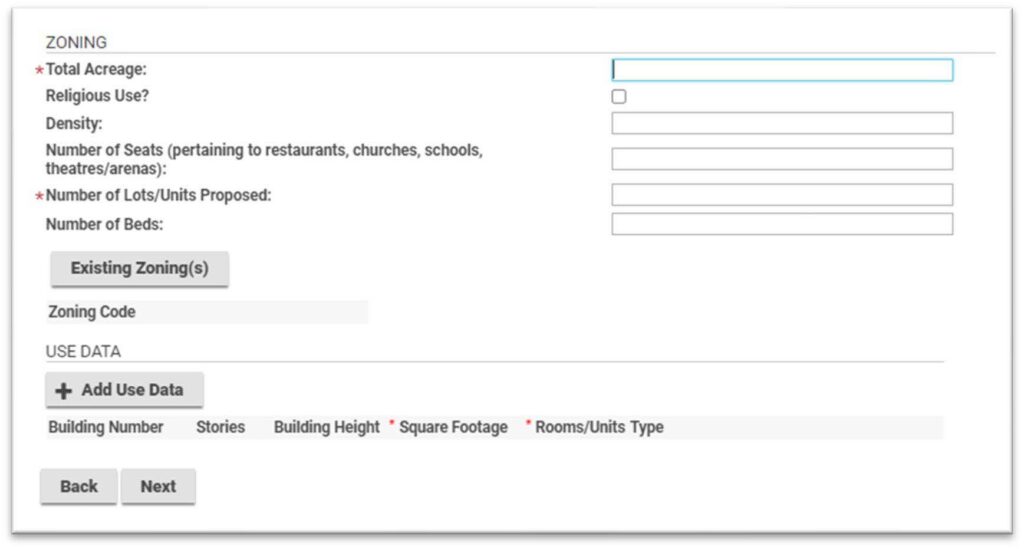
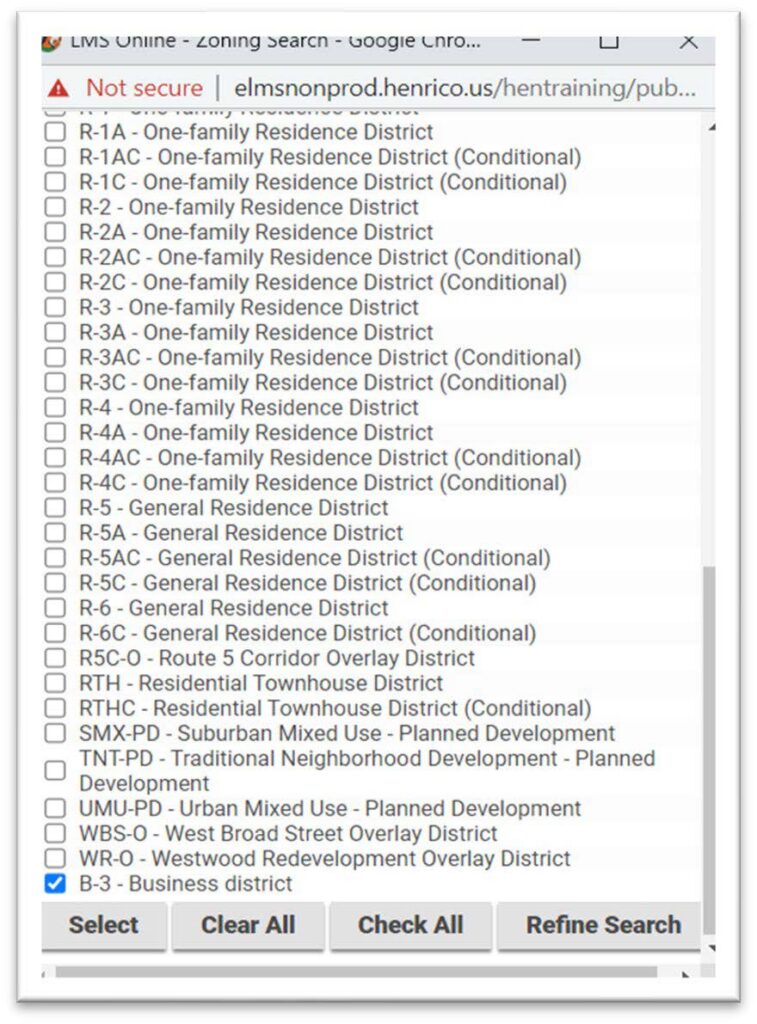
Click Existing Zoning, which will be displayed in a pop-up window. Multiple Zoning types can be selected.
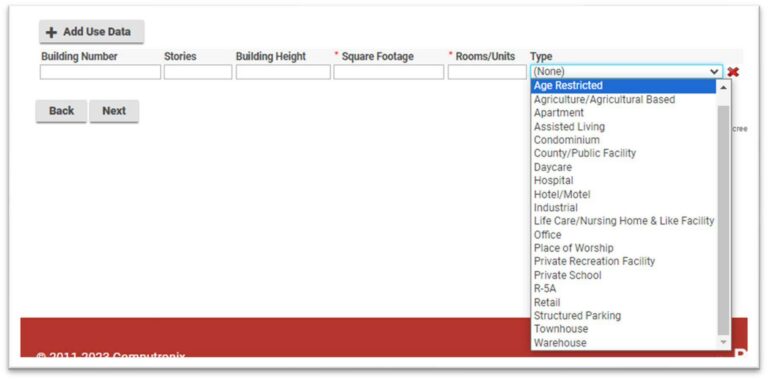
Use data is required for the types of development shown on the drop-down menu below that are proposing buildings. If no buildings are proposed, skip this step. Click the + Add Use Data button and provide the required information and select the appropriate Type from the drop-down menu. If there are multiple buildings proposed, click + Add Use Data button to add new rows. Identify the buildings by numbering them. Click Next.
If you clicked the + Add Use Data button by mistake, clicking the red X to the right of the row will allow you to remove the row and/or close the window without requiring information.
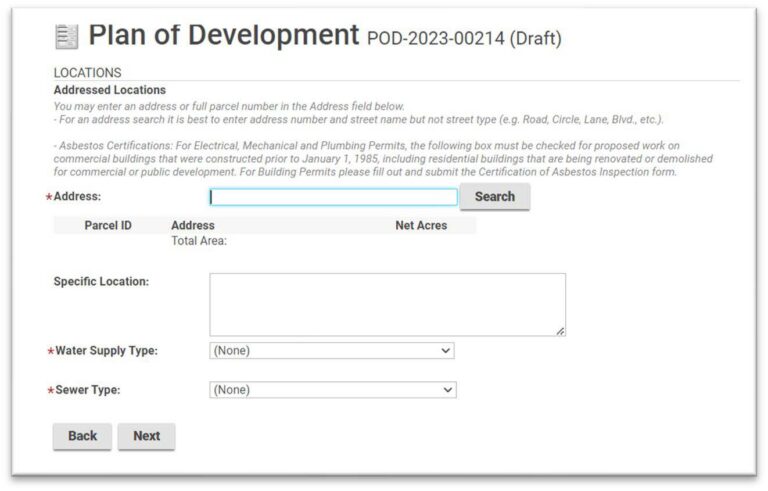
Complete all required fields. Enter an address and select the address from the pop-up window. If there are multiple addresses on the site, add all the parcels and then select Primary Address. You may also add a parcel number in lieu of an address. Complete Specific Location when applicable. Select the appropriate Water Supply and Sewer Supply. If anything, other than County is chosen for Water and Sewer, documentation must be uploaded for the Health Department review. If this is not provided, the submission may be held up in initial reviews until it is provided. Click Next.
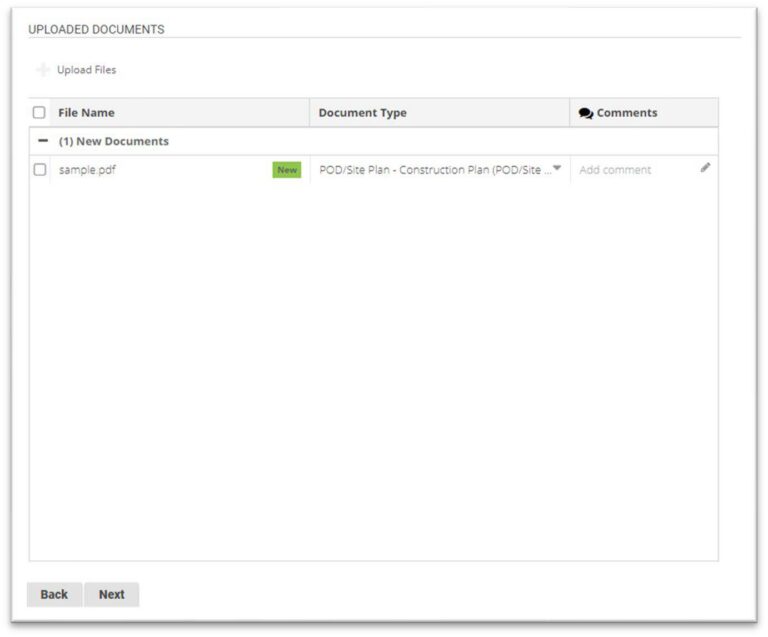
Upload all required and applicable optional documents. Click the + Upload Files button, select Document Type and add any additional comments if applicable. If your site is part of a special fee waiver program and you have already received approval for a fee waiver by the applicable agency, the related fee waiver documentation must be uploaded at this time. Once all application documents have been uploaded (indicated by New), click Next.
Do not add a Professional/Contractor. Add all parties involved under the Contacts section (described in the step below). Click Next.
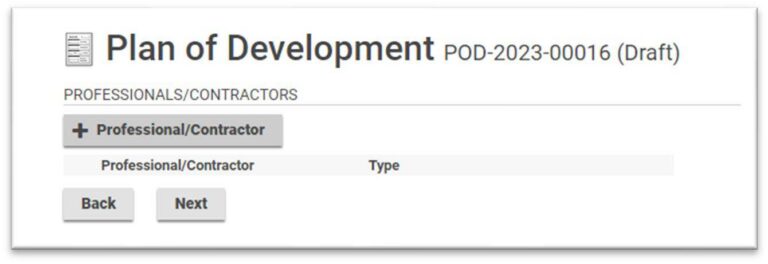
Add all Contacts by clicking +Contact. These should include anyone associated with the application who needs to be notified of its status.
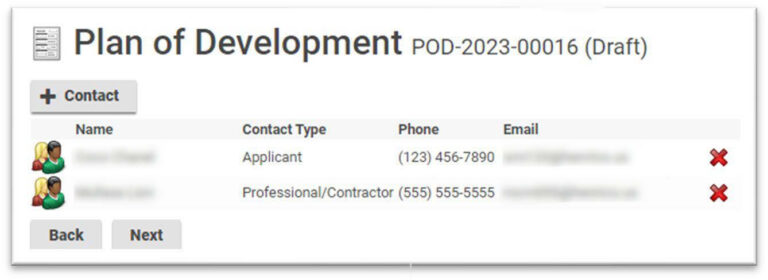
A pop-up window will be displayed with free form fields. Enter in the type of contact (e.g. Engineer/Surveyor, Owner, Representative, Developer) and the information necessary to receive notifications. Anyone associated with the job should have their contact information provided. For those included on the required signature documents, provide their contact information here as well.
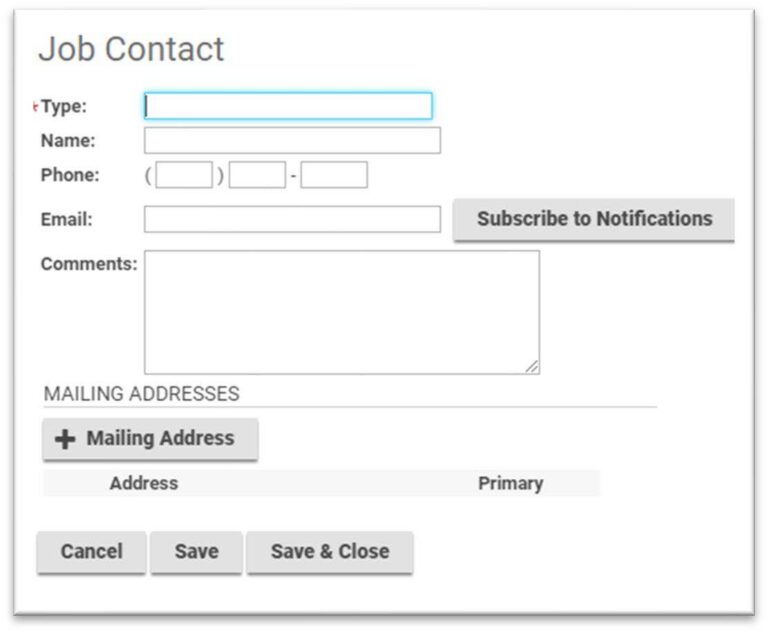
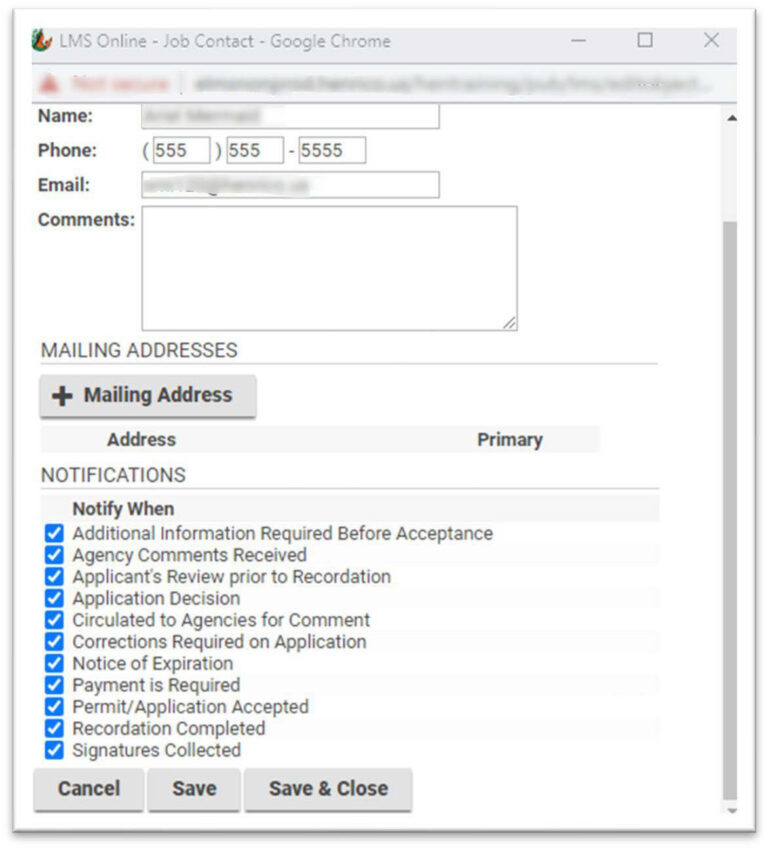
Click Subscribe to Notifications for every contact.

It is recommended to leave all items checked. Click Save & Close. If this is not done now, it is possible to Subscribe to Notifications on the home page after submitting the project. In order to subscribe to those contacts that were not manually entered, double click their name on the list and follow the step to Subscribe to Notifications.
Once you are finished adding all contacts for the job, click Next.
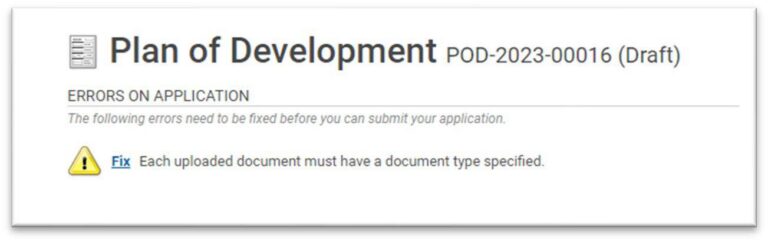
If there are any errors with the submittal, you should see a screen as shown below. Click the word Fix and it will take to you to the error needs to be corrected. Once fixed, you will need to move through the same screens again, clicking Next unless you need to revise anything.
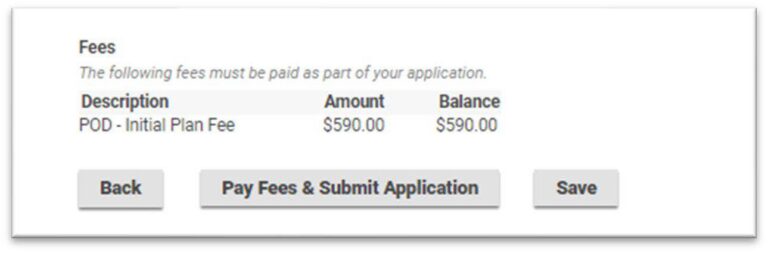
In order to complete the submittal, the filing fee must be paid (if the applicable Application Type selected requires such). Choose one of the following options for payment information.
- If you (as the applicant) are paying the applicable filing fee:
- Click Pay Fees & Submit Application will take you to the secured third-party payment website. Enter in valid payment information and click Continue.
- Read the applicable Authorization Terms and click to authorize payment and agree to the terms.
- Click the blue button to pay.
- If there is no filing fee:
- Simply click Submit Application.
- If the site is located within a designated Enterprise Zone, the filing fee will automatically be waived.
- For those projects that are part of a special fee waiver program with an approved uploaded fee waiver or are a County/Public Schools Project:
- Choose Save and call the Planning Department at (804) 501-4602 and to discuss the fee. Please have the Job number found at the top of the screen available.
- If eligible, once the fee has been adjusted by staff, navigate to Pay and select the outstanding fee you wish to pay. This will take you to the secured third-party payment website to complete the payment as outlined above.
- If the fee has been completely waived, log back into the system to finish the submission process by choosing Submit Application.
- If someone other than the applicant will be paying the fee:
- Choose Save and refer to Build Henrico Planning Department Alternative Fee Payment Guide for further instructions. Please provide the Job number found at the top of the screen to whomever is making the payment, as the number is required for that process. Once the fee has been paid, you as the applicant will need to log back into the system to finish the submission process by choosing Submit Application.
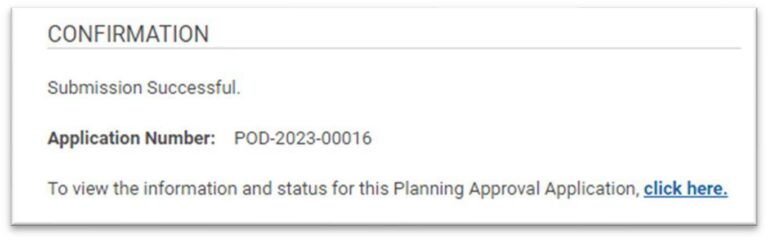
Once the application has been submitted (based on the various payment options), you will see the screen below confirming the process was successful. If you select the click here link, it will take you to an overview of the submission.
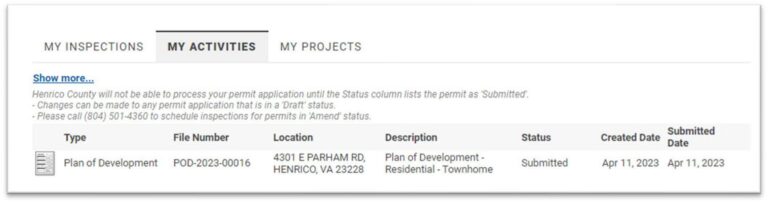
This can also be found on the home screen under the My Activities tab. To see the details of your submission, click the paper icon next to the applicable case.
Responding to Completeness Check Comments
If the plans failed the completeness check and require more information, at least one email will be sent to the applicant, and any other contact associated with the Job at the time of submission, to notify of the need for revisions.
In order to resolve those items:
a. If a link was sent in one of the automated emails, clicking the link will take you to your home page on the Customer Portal.
b. You could also navigate to the My Activities tab and in the status of the applicable Job, you will see “Application Incomplete.”
By clicking on the paper icon next to the application Type for the applicable Job, comments will be displayed of items that need to be addressed to pass the Completeness Check. Pay attention to this screen as it is the only one that will detail what information is needed. Click Next.
This will now take you back through the 7 application screens. Click Next to advance screens. You must add/upload any additional information detailed on the screen in Step 4. If you do not, you risk the application being rejected again for an incomplete application.
On the final screen, click Re-Submit to resubmit application or Save to save your work to return at a later time to complete and resubmit. If you have outstanding fees, those will need to be paid prior passing the Completeness Check.
Once you resubmit, you will see a confirmation screen.
Responding to Initial Review Comments
If the plans failed the initial review and require more information, at least one email will be sent to the applicant, and any other contact associated with the Job at the time of submission, to notify of the need for revisions.
An additional email from County Staff will be sent with a deficiency memo detailing items that
need to be resolved prior to the plan(s) being accepted for routing.
In order to resolve those items:
a. If a link was sent to you in one of the automated emails, clicking the link will take you to your home page on the Customer Portal. If an email was not sent to you, sign into your customer portal.
b. Navigate to the My Activities tab and in the status, you will see “Application Revisions”
By clicking on the Submit Revision link in the far-right column, you will begin the process of resubmitting the plan(s) for initial review.
Click on the Submit Revisions link. Enter your response in the mandatory response box and upload any documentation requested.
Click Submit.
Responding to Referral (review) Comments
Throughout the referral/review process, an email will be sent to the applicant, and any other contact associated with the Job at the time of submission, to notify of the completion of an agency’s review.
Once all mandatory review agencies have completed their referrals (reviews), a Referral Summary with the next steps in the review process will appear at the bottom of the Referral page within the specific Job.
At any point in the process, you can log into the Customer Portal to review the status of the referral job and issued comments.
On the Customer Portal:
- Navigate to My Activities.
- Select applicable Job.
- Navigate to Referrals tab.
- Select the applicable referral (there may be multiple if multiple submissions have occurred).
Select View Documents for each agency’s comments which will prompt a pop-up window with the applicable documents available for download. Select Download to view the actual documents. Alternatively, all available documents can be downloaded at one time (as a zip file) by selecting Download All Documents at the bottom of the agency listing.
Once all mandatory Agencies have completed their referral responses, a completion date will appear at the top of the screen. Additionally, at this time a Summary Recommendation and Referral Summary will be located at the bottom of the Referral page. The summary will include the next steps for this submission process/guidance on resubmission or when to submit for signature would be included here.
For agencies such as VDOT and the Health Department, comments will likely be outstanding after the referral is “completed” as they are permitted different review timelines under State Code.
To address the comments, log in to your account and follow steps above in the Responding to Initial Review Comment section, starting from “In order to resolve those items…” In addition to uploading plans and documents as requested, you must upload a response to comments letter outlining your responses to each Agency’s review comments.
Click Submit.
Once you submit, you will receive a confirmation screen.
When and how to Resubmit Plans
Plans on an agenda which require Director’s approval OR other plans which require an approval letter (Site Plan without Notice or Final Plats) should not be resubmitted for construction plan review until the approval is granted unless resubmission is necessary to obtain approval.
If plans do not need a prior approval letter (e.g. Minor Site Plan), resubmission can occur at any time.